


COPPER COOKWARE SEAMS: HOW DO THEY DO THAT?
Before CNC machines and even hand-held lathes to make copper pots, we made ‘em out of copper sheets. This meant that we were stuck using small sheets sent over (and heavily taxed) from England (even though the copper itself was mined in America) and riveting, braising, seaming and pressing those sheets together in order to create nearly all copper cookware.
Everything that was made with copper was usually required to be waterproof. From boilers to cups to coffee pots to washpans – everything held some sort of liquid. By the 1700 – 1800’s, tin and coppersmiths knew to line the cooking wares with tin in order so the copper and heat wouldn’t combine for an icky combination.
But before anything could be tinned, or considered finished at all, the sheets of copper would need to be cut, fit and joined together with seams which were then either soldered or braised together.
Because there’s few places to list these seams, and there’s buzz about vintage copper cookware out there, I thought I’d put it out in writing in case anyone wants to delve into it. I’ve learned this at the tinsmith and coppersmith apprenticeship I’m so lucky to have at Backwoods Tin!
The Lap Seam
This very easy connection is simply when the very ends of the metal sheet (which you’re going to bend or curve) are clipped to your seam/burr allowances. The two metal ends are then placed next to one another, overlapping slightly, and then usually soldered together.

Example of a lap seam exterior (on a tin mug).
The Crimp Seam
Make your hand into a C shape. Do it with the other hand. Now join the “C’s”. There’s your crimp seam. The copper sheet ends are bent into V shapes that fit together and then are pressed together. Another way to make a crimp seam along the base of a copper pot is to splay the bottom of the copper into a 90” burr, and fit a burred base around the burred bottom. Hammering down the exterior base burr over the top of the copper body burred base creates another version of the crimp seam.
(this can also become a double crimp seam if you take the finished seam and then push it up against the side of the vessel, or fold it over once more)

Crimp Seam example along the base of a vintage sheet metal copper pot.
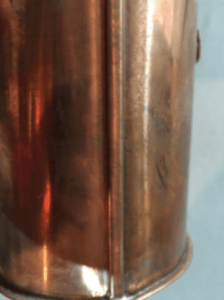
Exterior View of a Crimp Seam on a Copper Pot

The interior view of a crimp seam on copper cookware.
The Cramp Seam
A lot of very old vintage copper cookware has this particular method along the base. It has been called “dovetail seam” which is one way to describe it, as it certainly looks like splayed versions of the square dovetailing done on woodworking. However, in smith-talk, that’s a cramp seam. Those were insanely hard to do. Not only was the cutting very difficult, but also matching the copper together and then braising it to essentially melt the copper together, was incredibly painstaking. It’s one of the reasons they are rare – they were harder and more expensive to make so a plethora wasn’t made. They are beautiful…but tricky!

Example of a Cramp Seam on a copper cookware base.
So there you are! Three kinds of seams, all of which can be found on American copper cookware made the old way – sometimes more than one is used, depending on the copper cookware made. Either way, they all helped make those canteens, cook pots and beer mugs waterproof, which was the end goal after all.
{If you want to purchase the modern versions of pure metal American copper cookware, I’d be thrilled to share my copper obsession!}


Comments +